 n13eho's blog
给dash.js 3.0.1中内置BolaRule加上输出
1. 在树莓派上配置3.0.1所需环境
安装grunt
grunt是前几年使用的一个打包工具吧,现在dashjs的项目用的是webpack了。安装grunt很简单,只需要一句
|
|
当然需要提前配好nodejs环境。安装完之后验证

gurnt装不上怎么办
这里可能会出现找不到grunt的失败提示,那么多半是npm/bin的路径没有添加到环境变量中去。使用熟悉的
|
|
将这句话添加到结尾
|
|

最后记得再source一下
|
|
至此环境就配好了
2. 正确添加内置Bola的输出量
项目install准备
官方文档说的很清楚,这里过一遍
|
|

用grunt dev可以看得到我们的html目录在哪里

网站上线
通过一些顺藤摸瓜,可以得到访问目标是http://192.168.1.167:3002/samples/dash-if-reference-player/index.html,因此就应该把ngnix网站根目录改为当前的dashjs-301就好了
|
|
访问http://192.168.1.167/samples/dash-if-reference-player/index.html即可
完了之后把获取视频的地址改为http://10.61.140.191:3456/video-src/bbb-4s-an.mpd,这里用路由器做了一些端口转发,直接访问的是路由器的ip。(用内网突然访问不到了,所以换成这个
测试输出
这里就随便在/src/streaming/rules/abr/BolaRule.js中输出一些东西,打包,运行即可。验证的确是执行了Bola算法了的即可。

添加输出量
然后进行这些物理量的输出:
|
|
检查一下输出来的chunksize是否正常,这个版本的fastSwitch是没有bug的
3. 两个问题
useBufferOccupancyABR
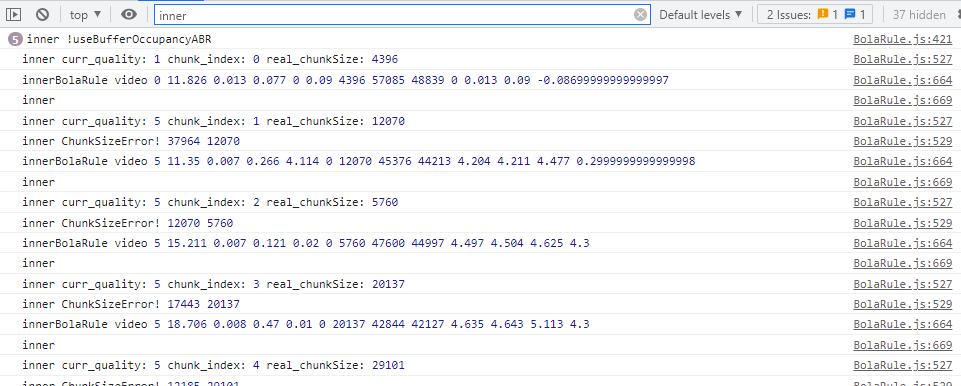
加上输出,跑了很多遍之后发现,每次输出来的chunksize大小块都是从index=4开始的,前四个块的信息并没有打印出来。但是肯定是下载了的。这一次的chunkerror原因不再是fastSwitch,我想了想,并没有执行到输出语句,那么一定是提前退出了。就这样排查到了useBufferOccupancyABR这个地方。
这个地方从rulesContext中取出了useBufferOccupancyABR这个setting中的布尔值
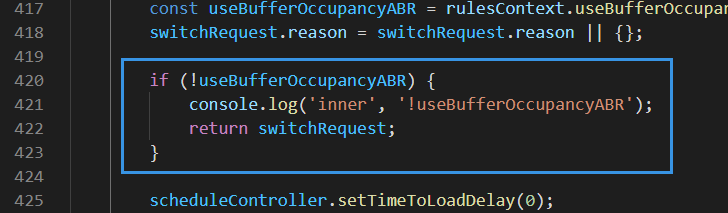
该变量在setting中的含义是:是否使用BOLA这个abr策略,默认值为false。

我用的就是BOLA,它为false就很不合理。因此我直接把这句return注释掉了(逃🏃
- 为什么使用BolaRule,但是却默认这个变量初始值为false?
- 那么到后面进行了前四个chunk下载之后,这个值变为true了?

每次都是如此规整的6次非使用bola,中间伴随着两次mpd请求的问题,😶我仍然不知道是为什么。但是这里也可以看出来,两个红框里面的对于非media的请求,就是应该提前return出来。
这里是否可以理解成一些误打误撞…
究竟是哪里让我卡住,理解不通了呢…
lastRequest.type !== ‘MediaSegment’
|
|
他会不规则地打印出来…原因???
4. 上服务器
树莓派上都能跑了的话,就把这一套搬到Ubuntu服务器上去。
- copy整个项目文件到根目录
- 更改
/usr/local/nginx/conf/nginx.conf,其中location字段改为/root/dashjs-301。并且将第一句的#user nobody改为user root。又是一个意想不到的权限403问题😋 - 重启ngnix服务:
nginx -s reload - 在main.js中修改mpd文件地路径:
http://serverIP:port/video-src/bbb-4s-an.mpd - 访问网址
http://the.server.ip.190:8007/samples/dash-if-reference-player/index.html - 结束
使用:option中取消Fast Switching ABR,选中ABR Strategy: BOLA,控制台filter为inner,load